
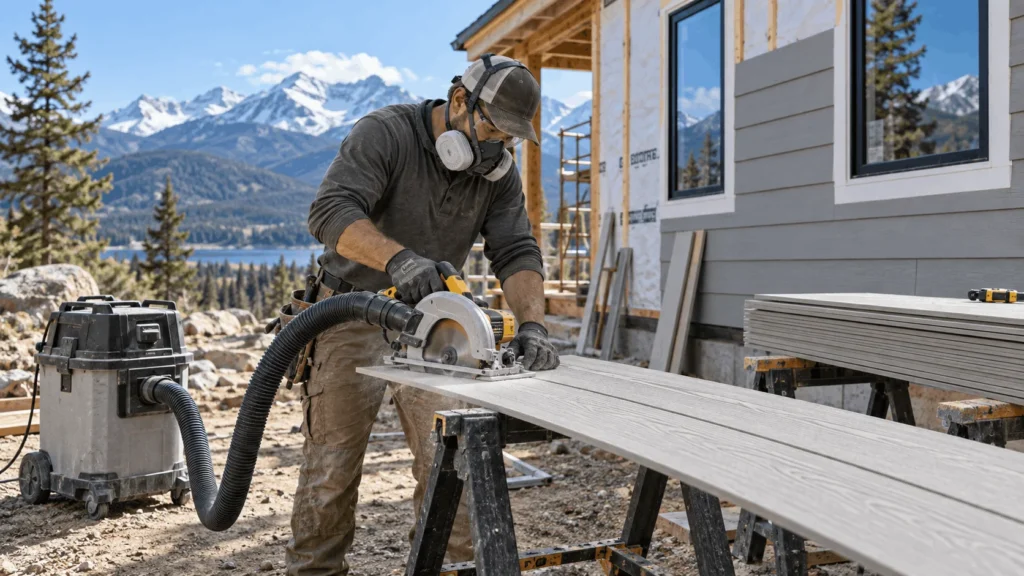
Cement siding installation follows the same logic as any siding job, wrap the wall, flash the openings, hang boards straight and seal the joints, but fibre cement (also spelled fiber cement) is heavier, dustier and less forgiving than vinyl or wood. It rewards a crew that plans the layout, controls dust, fastens into studs and gets the finish on within the manufacturer’s window. This guide explains what cement board siding is, the forms it comes in and exactly how it goes on a wall.
If you already know you want James Hardie lap siding, our detailed walkthrough on how to install Hardie board siding goes step by step through that one product. This article takes the wider view: the whole fibre cement category, how the different product types are installed, what the material is good and bad at, and what to ask a contractor before you sign.
✓Key takeaways
- Fibre cement siding is a mix of Portland cement, sand and cellulose fibres, formed into lap planks, panels, shingles and trim.
- It is highly fire resistant and resists rot, insects and warping. FireSmart Canada lists fibre cement boards among claddings with superior fire resistance.
- Installation order: water-resistive barrier and flashing, layout and starter, cut safely, hang bottom up, blind nail into studs, seal joints and trim, then prime and paint.
- Safety is not optional. Cutting creates silica dust, so cut outdoors with dust collection or shears and wear a respirator.
- Paint on time: primed products need a topcoat within 180 days of installation, with 100% acrylic recommended.
- Installed cost runs about $8.40 to $15.00 per sq ft (HomeStars) and $10 to $16 for Hardie in Calgary (April 2026).
In this guide
What is cement siding?
Cement siding, cement board siding, fibre cement siding, fiber cement siding and cement fibre board all describe the same material family: a dense board made from Portland cement, sand and cellulose fibres, cured under heat and pressure. It was developed as a durable alternative to wood, and it can be pressed with a wood-grain texture so that, once painted, it looks like cedar clapboard. James Hardie is the best-known brand in Canada and the United States, and other manufacturers, including Allura, Nichiha and CertainTeed, also make fibre cement siding with their own installation rules.
Fibre cement product types
| Product | Looks like | Typical use | Installation notes |
|---|---|---|---|
| Lap siding (planks) | Horizontal clapboard | Most common on houses | Starter strip, blind nailed into studs, overlaps between courses |
| Vertical panels | Smooth or grooved panels, board and batten | Gables, modern and farmhouse looks | Z-flashing at horizontal joints; battens cover vertical seams |
| Shingle and shake panels | Cedar shakes | Gables and accents | Staggered joints, each course lapped |
| Trim boards | Corner boards, window and door surrounds | Around all openings | Caulked joints and flashing above openings |
| Soffit and fascia panels | Flat or vented panels | Under eaves | Vented soffits for attic airflow and fire ember control |
For the vertical version, see our guide to installing board and batten siding.
Why fibre cement suits the Bow Valley
▲Bow Valley note
Canmore sits in the wildland-urban interface, and fibre cement is one of the claddings FireSmart Canada points to for good fire resistance, where vinyl can melt and expose the wall behind it. It also handles freeze-thaw cycles and strong chinook winds well, because it moves far less with temperature than vinyl or wood. In our experience that stability is a big reason homeowners in the valley choose it, even though it costs more to install.
Fibre cement pros and cons
What fibre cement does well
- Resists rot, insects and woodpeckers
- Listed by FireSmart Canada among claddings with superior fire resistance
- Dimensionally stable through temperature swings
- Holds paint well and looks like wood
- Long-lived with periodic repainting and recaulking
Where it demands more
- Heavy, so it needs two people and careful handling
- Cutting releases silica dust, which demands dust control and a respirator
- More expensive than vinyl, mostly due to labour
- Needs paint or a factory finish on a schedule
- Cracks if it is carried flat or nailed carelessly
What to prepare before installation
Tools and materials
| Item | Why you need it | Notes |
|---|---|---|
| Fibre cement blade (for example, HardieBlade) or shears | Clean cuts with less dust | Wood blades dull quickly. |
| Dust collection or HEPA vacuum | Controls silica dust | Do not dry sweep. |
| Siding nailer or hammer, corrosion-resistant fasteners | Fastening into studs | Use the fastener type the guide specifies. |
| Level, chalk line, story pole | Straight courses | Snap lines every course or two. |
| Weather-resistive barrier, flashing tape, Z-flashing, starter strip | Water management | The layer that keeps the framing dry. |
| Plank carrier or two-person carry | Moving boards on edge | Flat carrying cracks planks. |
| Caulk, primer and 100% acrylic paint | Sealing and finishing | Follow the manufacturer’s recommendations. |
| Respirator, glasses, gloves | Protection | N95 or better if dust cannot be controlled. |
Our complete siding installation tools checklist covers what to buy and what to rent, and it flags the extra kit fibre cement needs.
Check the wall
- Sheathing flat, dry and sound. Replace anything soft or stained.
- Framing at 16 in. or 24 in. on centre, with stud lines marked so every plank is fastened into a stud.
- Weather-resistive barrier lapped from the bottom up, taped at seams and penetrations.
- Windows and doors flashed sill first, then jambs, then head.
- Clearances above grade, roofs and paved surfaces as the manufacturer specifies. Confirm the numbers in the current guide for your product.
- Storage: keep boards flat, dry and covered, and do not install wet boards.
What sits behind a fibre cement wall
The cladding is the last line of defence, not the only one.
- Interior finishDrywall and paint on the room side.
- Framing and insulationStuds at 16 or 24 in. on centre.
- SheathingOSB or plywood, flat, dry and sound.
- Weather barrierLapped, taped and flashed.
- Fibre cementBlind nailed into studs, sealed and painted.
Simplified wall assembly for illustration. Follow your building plans and the Alberta Building Code for your project.
How cement siding is installed, step by step
The installation sequence
The same order applies to lap siding, panels and shingles.
- Prep and flashBarrier, tape, window and roof flashing.
- LayoutStory pole, level line, starter strip.
- Cut outdoorsDust control or shears.
- First courseLevel, plumb and true.
- Blind nailInto studs, snug heads.
- JointsStaggered, flashed or sealed.
- TrimCorner boards, caulk, drip cap.
- Prime and paint100% acrylic within 180 days.
Step 1: Wrap the wall and flash every opening
Install the weather-resistive barrier from the bottom up, lapping each upper layer over the lower one, and tape every seam. Flash windows and doors sill first, then jambs, then head, and add Z-flashing over horizontal trim and at roof-to-wall junctions. It is the least glamorous work and the most important, because the siding sheds most of the water, while the barrier and flashing handle the rest.
Step 2: Plan the layout and set the starter strip
Use a story pole to work out where each course will land so you do not finish with a thin sliver under the soffit or at a window sill. Snap a level line and fasten the starter strip along it. For lap siding, the first plank sits on the starter strip so that it hangs at the same angle as every plank above it.
!Crew tip
Do not trust the foundation to be level. Snap from a level reference and check every few courses with a tape measure from the bottom of the wall, so a small error does not grow into tapering courses at the top.
Step 3: Cut safely, outdoors
Mark the back of the board and cut outdoors, downwind of anyone working. James Hardie’s instructions rank a saw with a HardieBlade and dust collection as the preferred method, then shears or a score-and-snap knife as lower-dust options, and they say not to cut or grind with a power saw indoors.
×Watch out
Fibre cement dust contains respirable crystalline silica. Use dust collection or shears, wear a NIOSH-approved respirator such as an N95, and clean up with a vacuum or wet methods, never a dry broom.
Step 4: Hang the first course, then work upward
Slide the first plank onto the starter strip, check it against the level line and fasten it. Everything above follows this course, so spend time here. Work from the bottom up, keeping the overlap between courses that the guide specifies for your product and checking the courses against the story pole as you go.
Step 5: Fasten into studs
The manufacturer’s preferred approach for lap siding is blind nailing: the nail goes through the top edge of the plank into a stud, and the next course covers the head. Keep fasteners snug, not countersunk, and keep them back from the ends and edges as the guide shows. For panels, HardiePanel instructions call for fasteners about 3/8 in. from the panel edges and at least 2 in. from corners.
Step 6: Treat the joints
Butt joints between planks are placed in moderate contact, staggered from course to course and landed on a stud. Flash each joint or seal it as the guide allows. On vertical panels, horizontal joints get Z-flashing with a 1/4 in. gap, and the gap is not caulked. Battens or metal jointers cover the vertical seams.
Step 7: Corners, windows and trim
Use fibre cement trim boards or approved corner systems, leave the specified gap between planks and trim, and caulk it with a flexible exterior sealant. Add drip cap flashing over windows and doors so water sheds outward and does not track behind the trim.
Step 8: Prime, paint and seal
Factory-primed boards must be topcoated within 180 days of installation, and 100% acrylic paint is recommended. Do not use oil or alkyd paints, and do not paint wet boards. If you chose a factory-finished product, remove protective film promptly and touch up cut edges with the matching kit.
▲Bow Valley note
Paint, primer and caulk have minimum application temperatures printed on the label. In the Bow Valley shoulder seasons, plan finishing days around a dry stretch above that minimum rather than squeezing them in on a cold morning.
How much does cement siding installation cost?
Published Canadian price guides put fibre cement above vinyl and below cedar or metal. HomeStars lists fibre cement at about $8.40 to $15.00 per sq ft installed (updated August 2026). A Calgary contractor guide from April 2026 lists Hardie at $10 to $16 per sq ft, split roughly evenly between material and labour.
Fibre cement (Hardie) cost per sq ft, Calgary 2026
Labour is about as large a share as material. Published ranges, not quotes.
Source: Alpine Exteriors Calgary siding pricing guide (April 2026). Ranges vary by contractor and scope.
Whole-house totals depend on wall area, tear-off, sheathing repairs, trim and access. For the numbers in detail, see Hardie plank siding installation cost and siding installation cost by material.
Common mistakes with cement siding
- Cutting indoors or without dust control. Fine dust hangs in the air and is a health risk.
- Skipping flashing or the weather barrier. Missing head flashing is the classic cause of rot around windows.
- Carrying planks flat. They crack. Carry them on edge.
- Nailing between studs. A nail that misses the stud holds nothing.
- Jamming butt joints tight. Moderate contact is the target.
- Caulking a flashing gap that must drain. Follow the instructions for horizontal panel joints.
- Letting primer weather. Paint within the manufacturer’s window.
- Using the wrong paint. Oil and alkyd paints are not recommended.
DIY or hire a fibre cement installer?
Fibre cement is a step up in difficulty from vinyl. It is heavy, cuts need dust control, and mistakes are hard to undo. Many homeowners handle the prep and painting and hire a crew for the wrap, flashing and hanging, since the parts you cannot see later are the parts that matter most. If you decide to hire, ask how the crew controls dust, how they flash windows and which version of the manufacturer’s installation guide they follow.
Our siding installation service covers fibre cement across Canmore and the Bow Valley, and if you are also replacing windows, our window renovation team can schedule that ahead of the siding so the flashing is done once.
Frequently asked questions
How is cement siding installed?
The wall is wrapped and flashed, a level starter strip is set, and boards are cut outdoors with dust control and hung from the bottom up. They are blind nailed into studs, joints are staggered and flashed or sealed, trim and caulk are added, and the siding is primed and painted within the manufacturer’s window.
What is the difference between cement siding and fibre cement siding?
Nothing meaningful. Cement siding, cement board siding and fibre (fiber) cement siding all describe a board made from Portland cement, sand and cellulose fibres. Hardie board is one brand of it.
Is cement siding hard to install?
It is harder than vinyl. The boards are heavy, cutting requires dust control and every plank needs to be fastened into studs. Experienced DIYers can do small jobs, but flashing and layout are worth getting a professional to do on a whole house.
Do you have to paint cement siding?
Factory-primed boards need a topcoat, and the instructions we reviewed call for painting within 180 days of installation with 100% acrylic paint. Factory-finished options exist, but cut edges still need touch-up.
Is fibre cement siding fireproof?
It is not indestructible, but FireSmart Canada lists fibre cement boards among claddings with superior fire resistance. Non-combustible vents, flashing and good defensible space matter just as much as the siding itself.
Can cement siding be installed in cold weather?
The boards themselves are not the limit. Sealants, primers and paints have minimum application temperatures, so finishing steps are usually what restrict cold-weather work.
How long does fibre cement siding last?
With proper installation, flashing and periodic repainting and recaulking, fibre cement is a long-lived siding, and manufacturers back it with long product warranties. Follow the installation guide, because warranty coverage can depend on it.
Thinking about fibre cement for your home?
Old Goat Construction installs siding across Canmore and the Bow Valley. Tell us about your wall and we will give you a straight answer on materials, timing and cost.
Sources and further reading
- James Hardie, HardiePlank Lap Siding installation instructions (manufacturer PDF via BuildSite)
- James Hardie, HardiePanel Vertical Siding installation instructions (manufacturer PDF via BuildSite)
- FireSmart Canada, Construction guidance
- HomeStars, How much does siding cost?
- Alpine Exteriors, Siding cost Calgary 2026
